Showing posts with label clip. Show all posts

Sunday, April 28, 2013

DIY Harajuku Glitter Bone hair clip _ CheapoTM (Budget Gyaru)

Heya people~!! 
Basically , today I'm really tired from the Runway event yesterday hahaha ^^" So I'll just post a shirt post today and blog about the Runway event in a few days' time kay~ hehee... ^^" 

SO !

。*:★:゜★。。*:★(´・ω・人・ω・`)。:゜★。。*:★。:゜★。


 I messed around with the leftover I have from my neko hairpin tutorial *here* and did this this time around :3 

If you're not an arts and craft person , 
dont worry , cause neither am I wahahahaha xD ^^""""

If I can make it , 
so can you !!
*wink*  ヽ(`⌒´メ)ノ

BUT first , you need to assemble your materials :

1. foam sheet (preferrably black) 
2. Hair pin 
3. Glue (I used white glue , but I guess you can use other kind of strong glue too :3) 
4. Glitter Nail polishes /  nail-top coat + glitter powder

Le Steps!!


1. Draw a bone-shape on the foam sheet 
2. Cut the bone shape out , as shown below 
3. Place the bone strip above a paper because you're going to be painting it 
(and you dont want to dirty your table :D ) 


4. Paint the TOP surface of the bone strip with nail polishes .

From what I did , 1 and 2 alone is enough


But I used four to achieve that level of glitter ;D 
 since I wanted even more "glittery feeling" I used 3 . 
(You can use topcoat/random polish alternatively and top it up with powder glitter before layering it once again with topcoat!) .

 Remember to use 4 (topcoat) to seal the glitter in 
--> else, the glitter wont appear shiny ! :((


5. Let the PAINTED bone strip Dry 
6. Glue it to the hair pin 
7. Use rubber band to make sure the bone strip does not move around when drying :3 


Tested it out yesterday to shop for groceries, and yes , it  is sturdy enough :3 !! 


That's all for today folks ;D 
Hope this helps :3

Terumii~

  Follow me~ (。・ω・。)- テルテルミ  
Instagram : @teru_terumi

PS : if you're shopping at J-Runway @ Plaza Singapura
and you think that my picture is nice >,< 
Help VOTE for me wont you ? :D 
I'm contestant no 92
Thank you~~~ 


Tuesday, April 23, 2013

DIY Harajuku Bone hair pin _ CheapoTM (Budget Gyaru)

Heya~~  
I've finished exam recently and I thought , why not make some stuff so....
I did a tutorial on how to make a J-runway inspired neko hairpin , and today , I'm going to share about how I made my Harajuku inspired Bone hair pin/clips ;D 

If you're not an arts and craft person , 
dont worry 
neither am I

my methods are mostly foolproof. 

If I can make it , 
so can you !!
*wink*  ヽ(`⌒´メ)ノ

BUT first , you need to assemble your materials :

1. 1 box of clay (DAISO) 
2. Hair pin (I use bobby pin cause these are what I have lying around ) 
3. Glue (I used white glue , but I guess you can use other kind of strong glue too :3) 

Total cost : $2 
(for me , as I already have the glue and bobby pins lying around the house ^^, but the glue are pretty cheap actually O.O about $2-3 per one pretty big tube ) 

SO , this is the box of clay that I got :3 (sorry for the black hole in the middle  , I actually took out the white clay ^^"""" so at the time the pic was taken the box was empty ) 

Le Steps!!

1.Take out a thin strip of 7-8cm x 1cm piece of clay from the box 
(just approximate roughly ;D) 


2.Roll them into a nicely shaped cylinder with your fingers !!! 
Remember to wash your hands clean before this step as
 dirt /pencil marks on your hand may be transferred to the clay :((

3.Use a round-edged object to make a dent at the cylinder's end
I used a marker pen to help me :3 
You'll use this dent to help you shape the end of the " bone "


4.After shaping the end of the bone with your fingers , 
make another dent at the other end :3


Now , 5.roll the marker pen on top of the shaped bone to smoothen the surface


Ta-daaah ;D 
6. Admire the bone !! {{|└(>o< )┘|}}


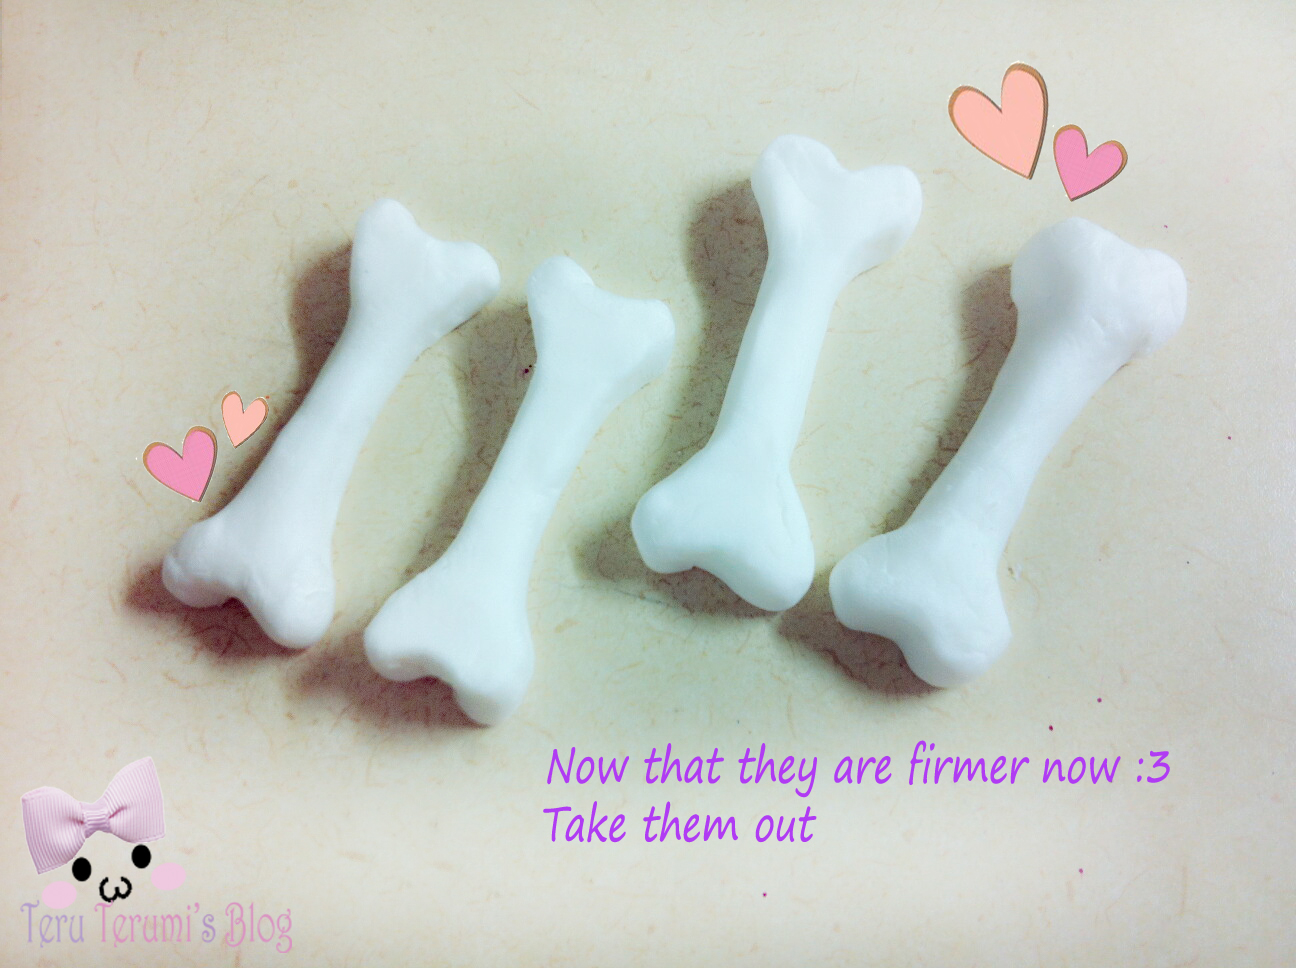
7.Keep them in a dry, clean place for 24 hours , 
away from prying hands ;D


They're hardened now :3  and ready to be handled ;D
8. Take them out and flip them over , 
then glue the pin/clip/etc etc you want on the BACK of the bone 

I used a bobby pin here because that's all I have at home for now :P 
The RED scotch tape/conduction tape is to ensure that the pin remains in position (doesnt flip over ) as I have to leave the white glue to dry over a few hours . If you're using super glue , I dont think you hve to wait long :3


Ja-jaaaang ~ ;D
And they're DONE !!! 
Ready for wear !! ;D 


BUT !!!!
It's not finished yet until I wore them out to test if they're sturdy ;D 

So .. here you are ;D wore them out for whole day long and they didnt budge xD
(camwhore alert!)


At the same time , My OOTD , FOTD and LOTD (lens of the day ) too wahahaha !!!
I went to Robinson Quay's Ramen Daikokuya to further my Ramen Conquest btw , but I'll talk about it in another post because I really am very tired already as of now wahahaha ^^" 

If you're wondering what's that on my right cheek , its a micropore tape lah 
(kinda like plaster :3 ) I have a wound there and have to cover it until next wednesday :((( 
*Sadlife* 

Vanity alert :
saw this barrel and whipped out my phone immediately when I realized I havent taken any OOTD that day , then asked my friend to help me take . My friend was already sighing wahahahaha xD


Advantage : 
- fun and easy to make :3
- you can make various size, shape , and colours of bone 
(albeit matte colours , but you can always layer them with polish/paint to colour them ;D)
-they're very light , not heavy at all ;D 
- pretty sturdy . 
Wore them out the whole day and readjusted them multiple times cause of the storm (and my short stature means people keep on brushing again my hairpin on crowded bus etc =[]=!!!! ) YET they didnt break etc xD 

CAUTION 
- Not water resistant . 
You may want to try layering it with nail polish etc to make it more water resistant , but I didnt because I want to attain their clayish texture (which kinda resembles bone) 
- They are not hard but rather on the spongy side :3 so you may not want to handle them roughly 

That's all folks ;D 
Hope this helps ;D


Terumii~

❤  Follow me~ (。・ω・。)- テルテルミ ❤ 

Facebook :  https://www.facebook.com/TeruTerumii?ref=hl

Instagram : @teru_terumi

Saturday, April 20, 2013

DIY Harajuku Neko (Cat) hair clip _ CheapoTM (Budget Gyaru)

A lot of you must have seen the uber Kawaii Kelly-chan's Neko-hairpin picture if you're following instagram ;D She got it from JRunway at Plaza Singapura

(follow her at http://www.kellykonomi.com/ ;D She's a suuuuuperr kawaiii blogger - so petite and fair and fun to talk to too  xD )


I did :3 
and at that moment I thought : "Waa~ that hairpin's soooo cute >,< !!! I want~~ " 

but you see, 
I'm on a tight budget :P

Meaning, after splurging myself on so many stuff and finally stumbling upon the uber cute neko hairpin, I kind of felt like wanting to stab myself for spending so much so now I cant afford to buy the neko hairpin anymore cause I'm simply 

T_T BROKE T_T

But then , me being my cheapo self , I realized :
"Hooo... if I cant buy it , maybe I can try making it myself " 

So... here goes ;D 

* I tried my best within the very limited period when I'm actually free - yes, I'm a true hardcore mugger *people who study like siao* because I need to read sth 5x before I actually can remember it OTL... It isnt the quality of the real thing obviously, but for me , its enough and it is actually pretty hardy and nice for me ;D *

1. What do you need ?


1. One Black Foam Sheet 
2. White nailpolish /White acrylic paint/ white correction liquid ? :P 
3. Pencil and Eraser
4. Scissors 
5. Brush / unused pen tip /nail dotting tool 

2. The STEPS :

A.Draw a cat's outline with pencil on the black foam sheet :3


B. Cut along the line :3 You'll get something like this below ;3


C. Draw the Neko's face on the foam with pencil 
(You CAN erase actually hahaha , just dont rub the eraser too hard or you'll damage the foam  ;D )


D. Trace the neko face (Eyes, mouth, whiskers) with white paint/ nail polish 
(In this case cheapo me used DAISO $2 nailpolish and I traced it with the tip of my broken pen , used as dotting tool . WHY ? cause I'm cheapo on a budget :P )


E. You should get something like this below after you're done :3 

F. Next , wait till the white paint is DRY 
Then, tidy up the white lines with a black permanent marker ;D 


G .VOILA !!! Now , you can tie up a ribbon etc to add to the neko pin ;D !!!
I am using DAISO's yarn (MUAHAHAHAHA !! DAISO is earnign loads of $$ from me I think lolllz xD eh ! But I bought this for my school stuff last time okay ;D so its leftover yarn and technically I dnt spend any $$ on this neko pin except for the black foam :3 )

SIDE ribbon

Neck Ribbon 
(I ended up choosing this)

F. Now , you can white glue the ribbon to the neko pin ;D


G. Last step , glue a pin on the back of the neko head 
(You can use normal black bobby pin too cause it wont be visible anyway , but i have this , so I am using this . This is from DAISO too, one pack have 4-5 of them ;D so its about 40 cents ) 


And you're done~~~ ;D

Of course being paranoid , I wore them out for one day to see how durable they are ;D
Rest assured, YES, they are durable . I tried tugging them of and they didnt come off :D

This is how they look when worn out

Sooo...

approximate time spent : 20-30 minutes 
approximate cost (for me ) : about $1 
(foam only. cause I used stuff lying around your house. just try being creative and use anything you have k ;D you dont have to stick to this material list ;D Happy adventuring ;D )
-----------------------------------------------------------------------------------------------------
and just some short update :

I went to a sebaceous cyst surgery 2-3 weeks ago , so yes , that on my right cheek is a micropore tape to close the miny wound . It is healing well , but I'm just getting annoyed that I cant wear make up while its healing (no make up for 3 weeks already T_T) 

and Ee-chan told me , 
this picture below looks like some royal signalling "blessing" to other people
(am I making any sense with my above statement ? O.o"""
nevermind hahaha ^^" )


and meanwhile, the reason I cant buy the neko pin :

these babies 


Ciao~~ ❤ ❤ 


Terumii~~
❤  Follow me~ (。・ω・。)- テルテルミ ❤ 

Facebook :  https://www.facebook.com/TeruTerumii?ref=hl

Instagram : @teru_terumi